A Frame object is used to organize and structure project's interface, creating composed views for users inside E3 Viewer's or browser's main window. Many times, an application requires only a main Screen, which is the doorway to an application. From then on, users can browse other Screens, which replace the first one, unifying the process view. However, more than one view in the same document or the same project are supported. This is useful when an application uses a Screen that never changes, or has little changes (such as a menu, for example), and another part that is a Screen's browsing area. To use this resource, follow this procedure:
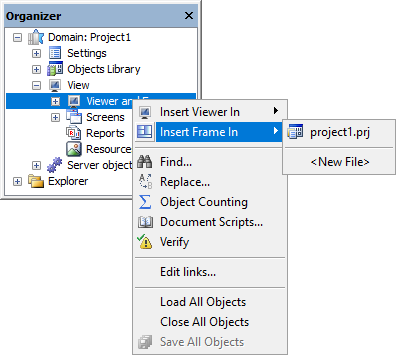
1.Right-click a project's name in Explorer and select the Insert - Frame option. In Domain mode, right-click the View - Viewer and Frames item, select the Insert Frame in option, and then the project's name.

Inserting a Frame in Domain mode
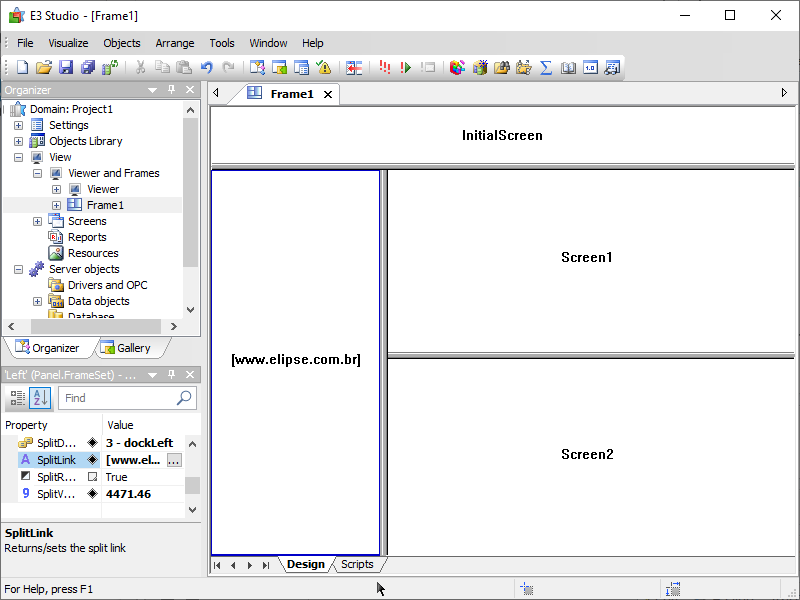
Frames have subdivisions, called Splitters, which can be inserted or removed from a Frame by right-clicking its Design view. Initially, a Frame has one main Splitter, which can be further subdivided either horizontally or vertically into two or more Splitters, and so on.
For each new pair of Splitters created by the Split Horizontally and Split Vertically options, there is always a Main Splitter and a Secondary Splitter. Only a Main Splitter have values that explicitly define its position, and a Secondary Splitter gets the remaining value.
So, when a Splitter is subdivided horizontally, its SplitDockPosition property gets the dockTop value. Likewise, if a subdivision is vertical, this property gets the dockLeft value. A Secondary Splitter's property then gets the dockRemaining value, which means it occupies the remaining space.
The Organizer's object icons identify the exact position of every Splitter.
Splitter positioning options
Option |
Description |
|---|---|
dockBottom |
This Splitter is below the parent Splitter |
dockTop |
This Splitter is above the parent Splitter |
dockLeft |
This Splitter is on the left of the parent Splitter |
dockRight |
This Splitter is on the right of the parent Splitter |
dockRemaining |
This Splitter occupies the remaining space after positioning its sibling Splitter |
Every Splitter corresponds to a view of a Screen or Frame of a process, or to a URL (Universal Resource Locator). To use this resource, follow these procedures:
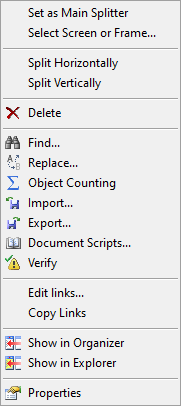
1.Right-click an open Frame and select one of the options: Split Horizontally or Split Vertically, according to Splitter's type.

Inserting a Horizontal or Vertical Splitter
2.To remove a Splitter, right-click an open Frame and select the Delete ![]() option.
option.
3.Users can invert a Splitter's original selection (turn a Main Splitter into a Secondary Splitter, and vice versa) using the same menu. In a Main Splitter, right-click a Frame and select the Set as Secondary Splitter option. In a Secondary Splitter, select the Set as Main Splitter option. Splitters' SplitDockPosition property is automatically configured to reflect this change.
4.With the Select Screen or Frame option, users can select a Screen or Frame to link to Splitter's SplitLink property, via AppBrowser.
5.Users can insert as many Splitters as needed in a Frame.

Frame Splitters
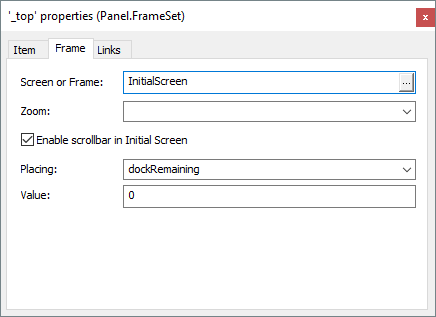
To configure Frame Splitters, right-click the Organizer on a Splitter and select the Properties option.

Frame configurations
The available options are described on the next table.
Available options for Frame tab
Option |
Description |
|---|---|
Screen or Frame |
Determines either a Screen or a Frame to be opened by a Splitter. It is only enabled if a Splitter has no children. This field is equivalent to the SplitLink property |
Placing |
Determines Splitter's position on a Frame. This field is equivalent to the SplitDockPosition property |
Value |
Determines the value to attribute to a Frame. It is only visually effective if modified in a Main Splitter. This field is equivalent to the SplitValue property |
NOTES |
•All Frame options that are available via contextual menu (by using the right mouse button) are also available by using the shortcut key SHIFT + F10, which corresponds to the application or menu key •The Properties Window of a Frame can be opened by using the shortcut keys ALT + ENTER or ALT + Double-click. |
Some Frame or Splitter properties can be configured via Properties List, with no need for creating scripts. To configure any property, locate it on Properties List and perform the necessary adjustments. For further information, please check the E3 Reference and Scripts Manual.