To view on the Internet, as well as on an Intranet or a local computer, users must install and configure IIS (Internet Information Services), or another Internet server.
IIS is supplied along with Windows. To install and configure it, follow these procedures:
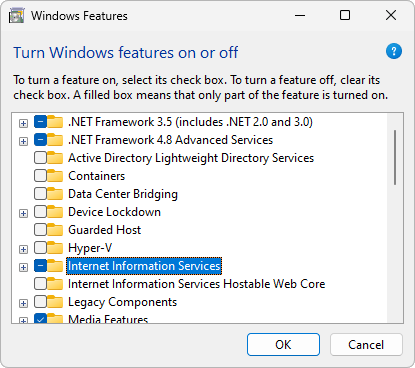
1.On Windows 11, click the Start menu, select Settings, click Apps, click Optional features, and then select More Windows features.
2.On Windows 10, click the Start menu, select Settings, click Apps, click Apps & features, click Optional features, and then click More Windows features.

Windows Features window
3.Locate the Internet Information Services item on the list and click ![]() to expand all its sub-items.
to expand all its sub-items.
4.Select, at least, the following options and click OK.
•Web Management Tools
•IIS Management Console
•IIS Management Scripts and Tools
•IIS Management Service
•World Wide Web Services
•Application Development Features
•ASP
•ISAPI Extensions
•ISAPI Filters
•Common Http Features
•Default Document
•HTTP Redirection
•Static Content
•Security
•Basic Authentication
•Request Filtering
5.IIS then starts its installation process.
6.Wait for this process to finish to configure IIS.
After installing IIS, files e3web.asp, e3web2.asp, docwrite.asp, docwrite2.asp, and e3downloader.cab must be copied to c:\inetpub\wwwroot. This folder was created during IIS installation. Apart from .asp files, WebViewer's installer must also be copied to this folder. This installer, e3webviewer-x86-enu.exe, is used when a client computer accesses a server for the first time, in case Elipse E3 was not previously installed on that computer. This file can be downloaded from Elipse Software's website.
IIS still needs to be configured to work correctly. Configuration is different in case IIS and E3 Server are on the same computer or on different computers. To configure it, please check Elipse E3 Installation Guide.