1.Insert a Formula object in the application.
2.Configure a Database and a table. Use an existing Database on this project, and name this table as "Production".
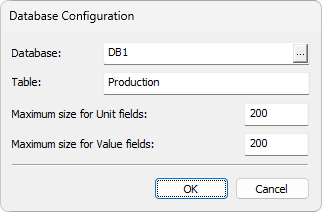
Configuring a Database and a table
3.Create the following Templates in this Formula:
•External Diameter: With an absolute value restriction between 50 and 80
•Internal Diameter: With a difference value restriction of 10 and 10
•Height: With a restricted limit

Templates
4.The next step defines Units relative to this Formula. Before creating these Units, however, users must create Tags for this Formula. To do so, insert a Folder named "Formula" on a Data Server, and inside it the Folders "Engine1" and "Engine2". Inside these Folders, create the Internal Tags shown on the next figure.
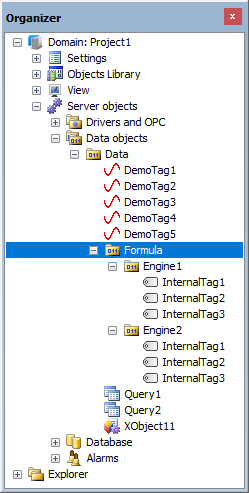
Creating Tags
Create the Units "Engine1" and "Engine2" in this Formula. Link each field on these Units to the previously created Tags.

Linking Tags to Formula Units
6.Define all Value Sets to load later into Tags. Create the Value Sets named from "Model1" to "Model4", and type their values as shown on the next figure.

Configuring Value Sets
7.Create a new Screen named "Formulas".
8.Create SetPoint-type objects on this Screen, which must be linked to each Tag in this Formula, and adjust this Screen's size to the size of these objects. This Screen should look like the next figure.
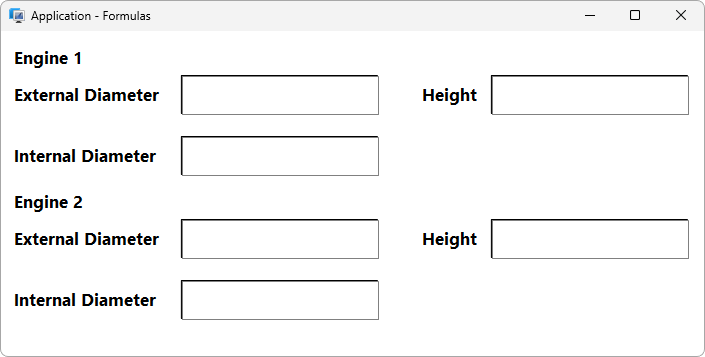
Formula screen
NOTE |
Sometimes an error may occur on a Screen that makes images disappear. To solve this issue, disable the Hide MS-DOS extensions for registered files option. This option is available on Windows Explorer. |
9.Create a Command Button on this Screen with a "Load Values" caption. This Button displays a dialog box with existing values and Units to which these values can be loaded, and users can select any option. To do so, create the following script in this Button.
Sub CommandButton1_Click()
Application.LoadFormulaDlg_
"Formula1", "Engine1, "Engine2",_
"Model1, Model2, Model3, Model4"
End Sub
Formula1 is the name of the Formula object and LoadFormulaDlg is a Viewer method. When executing this method, the dialog box on the next figure is displayed.
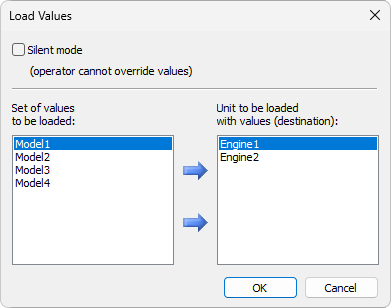
LoadFormulaDlg method's dialog box
10.On the right side are displayed the Units created in this Formula, as well as the Value Sets. The Silent Mode option prevents users from overriding values saved on disk, which are loaded to the Tags.
11.Using this Button, users can check the application working with Formulas and Tags receiving values from disk. This is one method for loading values from a Formula, but there are also methods in which users do not need to select values or Units on a dialog box.
12.Now create a SetPoint object on this Screen and a Command Button with an "OK" caption. Along with this SetPoint, place a Label with a "Model:" caption. On this Button, users must create the next script.
Sub CommandButton2_Click()
Application.LoadFormulaValues_
"Formula1", "Engine1", "Model1"
Screen.Item("Text16").Value
End Sub
Text16 is the name of the last SetPoint inserted on this Screen. This command loads a Value Set specified in this SetPoint to the Engine1 Unit. When executed, this method then searches for a Value Set on disk. If found, this method loads it according to restriction patterns defined in this Formula's Template. Fields with open restrictions may have their values changed by users. If users do not want to be warned about changed values in loaded fields, they must use the silent mode.
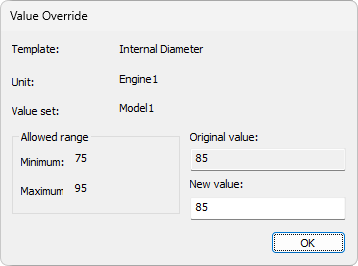
Value change
However, there is an alternative, Viewer's LoadFormulaValuesQuiet method. Users opt by the Silent mode on a Screen, by using a Check Box for this.
1.Create a Check Box on this Screen.
2.Place a Label on it, with a "Silent" caption.
3.Return to the OK Button script, and change it to the following code.
Sub CommandButton2_Click()
If Screen.Item("CheckBox1").Value = True Then
Application.LoadFormulaValuesQuiet_
"Formula1", "Engine1", "Model1"
Application.LoadFormulaValuesQuiet_
"Formula1", "Engine1", "Model2"
Application.LoadFormulaValuesQuiet_
"Formula1", "Engine1", "Model3"
Application.LoadFormulaValuesQuiet_
"Formula1", "Engine1", "Model4"
Else
Application.LoadFormulaValues_
"Formula1", "Engine1", "Model1"
Application.LoadFormulaValues_
"Formula1", "Engine1", "Model2"
Application.LoadFormulaValues
"Formula1", "Engine1", "Model3"
Application.LoadFormulaValues_
"Formula1", "Engine1", "Model4"
End If
End Sub
CheckBox1 is the name of the Check Box. This uses the LoadFormulaValuesQuiet method if this object is enabled. Otherwise, the LoadFormulaValues method is used.
4.Repeat the previous procedures, since creating a SetPoint for items of Engine2, by modifying all required scripts. After finishing these changes, this Screen should look like the next figure.
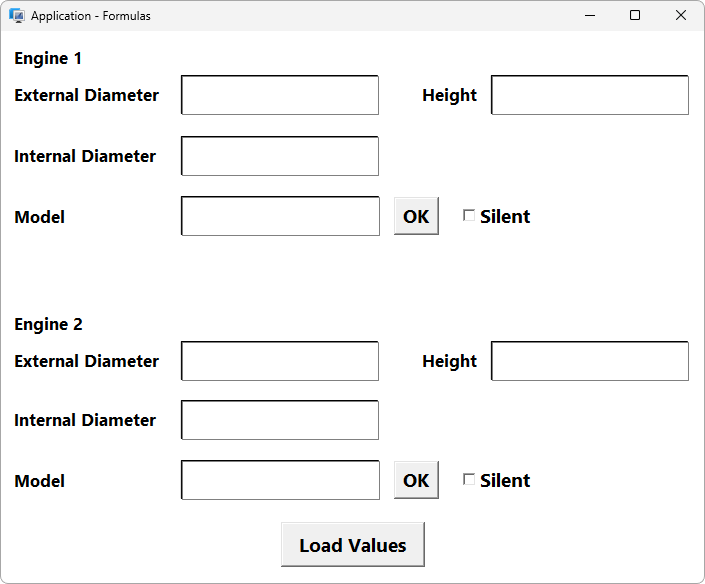
Final Screen for this Formula
Execute this application and check its results.